
 遠端桌面-登錄
# FastWeb遠端桌面-登錄
以下我們以Myrtille登錄的說明為例,說明在設定介面整合過程中的注意事項。如果尚未了解Myrtille,請參閱Myrtille說明,以下是Myrtille登錄的介面說明:
獲取到介面后,將地址複製至
http://{server}/Myrtille/?__EVENTTARGET=&cid={connectionId}&connect=Connect%21
2
- 介面URL
http://{server}:8008/MyrtilleAdmin/ConnectionService/GetConnectionId
- 請求方式
POST
- Content-Type
json
- 請求Body參數
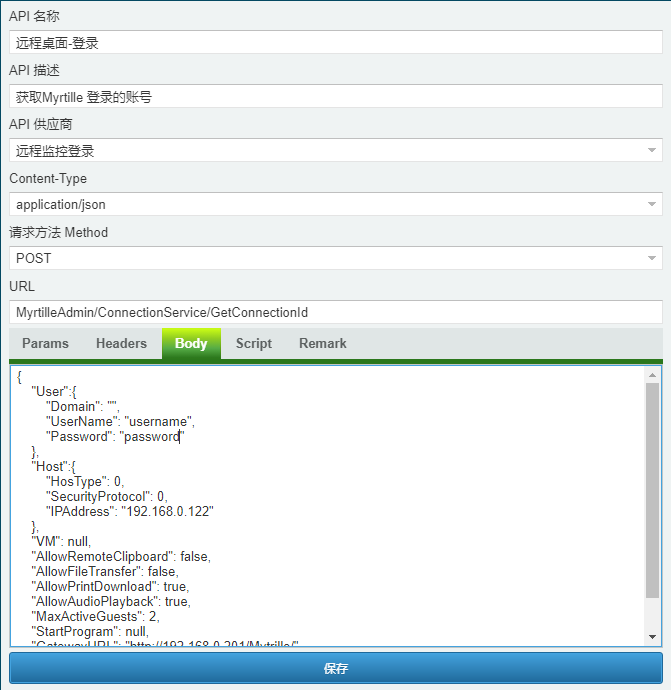
{
    "User":{
        "Domain": "",
        "UserName": "username",
        "Password": "password"
    },
    "Host":{
        "HosType": 0,
        "SecurityProtocol": 0,
        "IPAddress": "192.168.0.122"
    },
    "VM": null,
    "AllowRemoteClipboard": false,
    "AllowFileTransfer": false,
    "AllowPrintDownload": true,
    "AllowAudioPlayback": true,
    "MaxActiveGuests": 2,
    "StartProgram": null,
    "GatewayURL": "http://{server}/Mytrille/"
}
2
3
4
5
6
7
8
9
10
11
12
13
14
15
16
17
18
19
20
| 參數名 | 示例值 | 參數型別 | 參數描述 |
|---|---|---|---|
| User | Object | 使用者設定 | |
| User.Domain | String | 域名資訊 | |
| User.UserName | username | String | 登錄使用者名稱 |
| User.Password | password | String | 登錄密碼 |
| Host | Object | 主機資訊 | |
| Host.HosType | 0 | Number | 主機型別 |
| Host.SecurityProtocol | 0 | Number | 是否啟用安全協議 |
| Host.IPAddress | 192.168.0.122 | String | 主機的IP地址 |
| VM | null | String | 是否為虛擬機器,如果是則設定名稱 |
| AllowRemoteClipboard | false | Boolean | 是否設定遠端剪下板 |
| AllowFileTransfer | false | Boolean | 是否設定檔案傳輸 |
| AllowPrintDownload | true | Boolean | 是否允許下載列印的內容 |
| AllowAudioPlayback | true | Boolean | 是否允許音訊回放 |
| MaxActiveGuests | 2 | Bumber | 允許的最大客戶端活躍數量 |
| StartProgram | null | String | 是否允許開始程式,如有則此處填寫開始程式的地址 |
| GatewayURL | http://{server}/Mytrille/ | String | 閘道器伺服器所在的地址 |
- 成功響應示例
"5f6ff13c-609e-4724-a053-340b574f87b7"
- 失敗響應示例
{"Message":"An error has occurred."}
# 1. 分析
根據對上述介面的地址分析,可以將地址拆分成基礎地址與請求參數兩部分。其中http://{server}:8008是作為基本的請求地址部分,MyrtilleAdmin/ConnectionService/GetConnectionId部分作為額外的URL資訊來使用。
點選[系統工具]-[介面整合(Server)],打開介面整合界面,輸入API供應商以及API伺服器的地址,填寫相關說明,點選[儲存]。

點選[系統工具]-[介面整合(API)],打開介面整合(API)界面,在其中設定Myrtille的RestAPI請求資訊。
點選[新增]按鈕,打開新增API界面,在其中輸入API的資訊。
API名稱與API描述部分可自行設定。
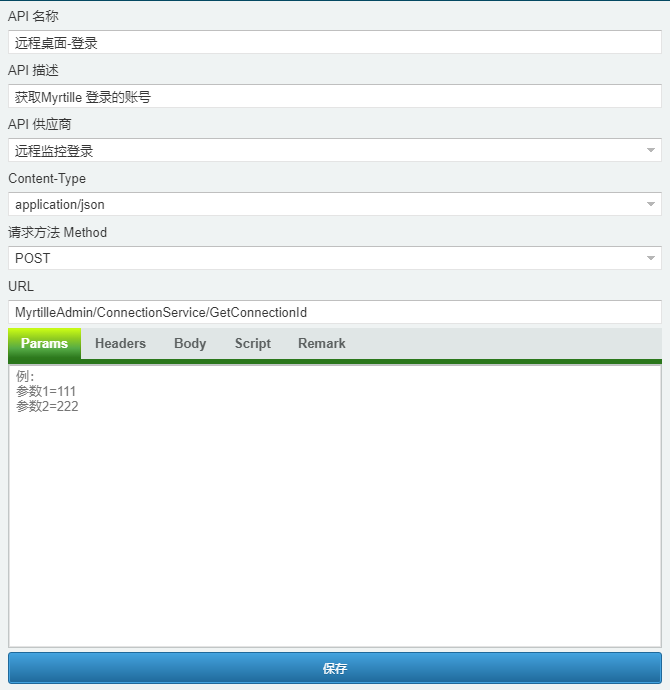
API供應商處選擇剛才建立的API供應商。
上文的API說明中已指出使用的Content-Type以及請求方法,此處按照說明中提供的內容選擇。
URL處設定額外的路徑資訊,上文的API中指定了MyrtilleAdmin/ConnectionService/GetConnectionId,則此處填入。
Body處填寫請求的主體內容。按照API說明中的格式進行填寫。
儲存后,點選[儲存]按鈕,返回管理頁面。
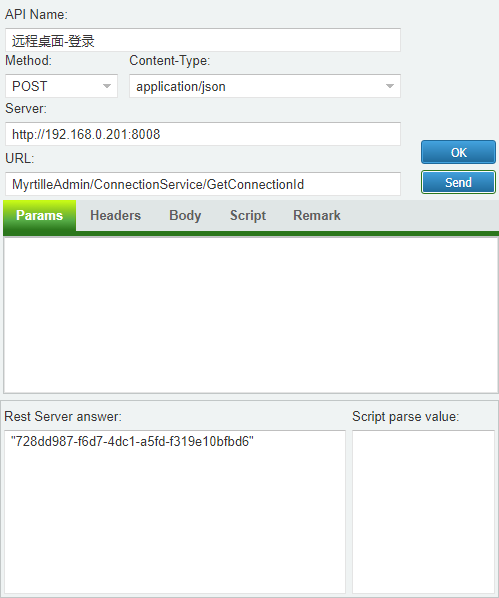
找到剛才建立的API,點選[API測試],打開API管理器界面,在目前界面下,點選[send]按鈕,觀察Rest Server answer處顯示的內容,如果顯示的內容為下圖樣式的,則設定完成。
# 2. 用法
按照FastWeb快速上手的方法進入至模組設計界面,在設計頁面上放置一個TUgButton,TUgRestApi與TUgURLFrame,分別命名為btnMyrtilleLogin,restMyrtilleLogin,UgURLFrame,雙擊restMyrtilleLogin,設定其指定的API為遠端桌面-登錄,設定btnMyrtille的OnClick事件、restMyrtilleLogin的ResultData事件。以下給出示例程式碼,詳情可參考RestAPI綜合運用2。
procedure btnMyrtilleLoginOnClick(sender: tobject);
//Myrtille登錄
begin
  restMyrtilleLogin.Send;
  UgPageControl01.ActivePageIndex := 0;
end;

procedure restMyrtilleLoginResultData(sender: tobject;aresult: string);
//登錄
begin
   myrtilleAuthToken := StringReplace(aresult,'"','');
   mmLog.Lines.Add('auth_token:' + myrtilleAuthToken);
   UgURLFrame.URL := 'http://nas.isoface.cn:33033/Myrtille/?__EVENTTARGET=&cid='+ myrtilleAuthToken + '&connect=Connect%21';
end;
2
3
4
5
6
7
8
9
10
11
12
13
14