
 瀏覽-照片-顯示元件
# FastWeb 瀏覽-照片-顯示元件
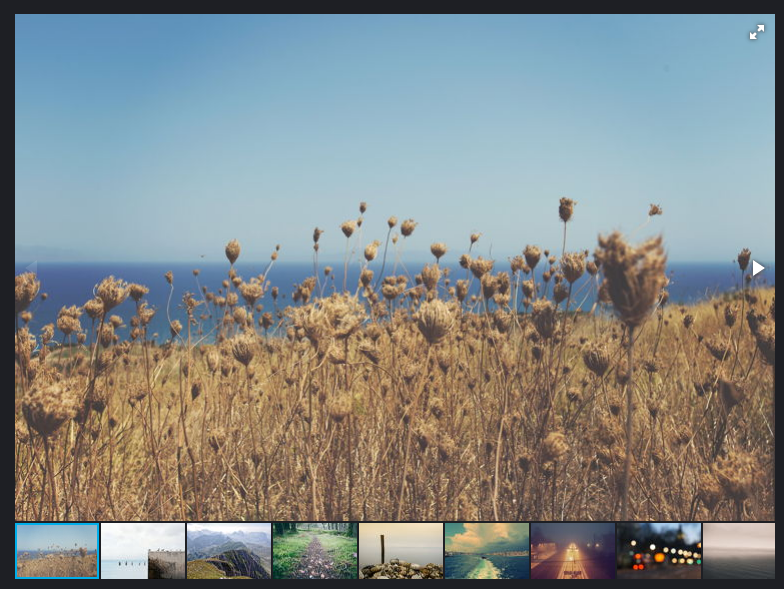
fotorama是一個開源的照片顯示工具,通過引入標籤以及圖片鏈接的方式來打開顯示元件中的內容。實現類似於幻燈片播放的效果。
# 1. 下載示例
點選https://github.com/artpolikarpov/fotorama/archive/refs/heads/master.zip (opens new window)下載庫檔案以及關聯的示例等資訊。
# 2. 確認參數
使用文字編輯器html文件。顯示的內容如下:
<!DOCTYPE html>
<html>
	<head>
		<meta charset="utf-8">
		<title></title>
        <!-- jQuery 1.8 or later, 33 KB -->
        <script src="https://cdnjs.cloudflare.com/ajax/libs/jquery/1.11.1/jquery.min.js"></script>

        <!-- Fotorama from CDNJS, 19 KB -->
        <link  href="https://cdnjs.cloudflare.com/ajax/libs/fotorama/4.6.4/fotorama.css" rel="stylesheet">
        <script src="https://cdnjs.cloudflare.com/ajax/libs/fotorama/4.6.4/fotorama.js"></script>
	</head>
	<body>
        <!-- Add images to <div class="fotorama"></div> -->
        <div class="fotorama"
            data-allowfullscreen="true"
            data-nav="thumbs">
          <img src="https://s.fotorama.io/1.jpg">
          <img src="https://s.fotorama.io/2.jpg">
          <img src="https://s.fotorama.io/3.jpg">
          <img src="https://s.fotorama.io/4.jpg">
          <img src="https://s.fotorama.io/5.jpg">
        </div>
	</body>
</html>
1
2
3
4
5
6
7
8
9
10
11
12
13
14
15
16
17
18
19
20
21
22
23
24
25
2
3
4
5
6
7
8
9
10
11
12
13
14
15
16
17
18
19
20
21
22
23
24
25
通過閱讀,我們發現這些<img>標籤的內容組成了照片序列的順序,故在這裡我們將這些<img>標籤使用參數param_list來代替。
# 3. 修改模板
# 3.1. 本地化處理
觀察上述的文字內容,將其中的外鏈地址中的檔案下載至目錄中。其中:
https://cdnjs.cloudflare.com/ajax/libs/jquery/1.11.1/jquery.min.js
https://cdnjs.cloudflare.com/ajax/libs/fotorama/4.6.4/fotorama.css
https://cdnjs.cloudflare.com/ajax/libs/fotorama/4.6.4/fotorama.js
https://cdnjs.cloudflare.com/ajax/libs/fotorama/4.6.4/fotorama.png
https://cdnjs.cloudflare.com/ajax/libs/fotorama/4.6.4/fotorama@2x.png
1
2
3
4
5
2
3
4
5
下載完成後請將上述檔案放置於libs資料夾中。
https://s.fotorama.io/1.jpg
https://s.fotorama.io/2.jpg
https://s.fotorama.io/3.jpg
https://s.fotorama.io/4.jpg
https://s.fotorama.io/5.jpg
1
2
3
4
5
2
3
4
5
以上的圖片檔案在下載後放入image資料夾中。
將上述庫檔案地址都修改爲本地地址,最終修改完顯示如下:
<!DOCTYPE html>
<html>
	<head>
		<meta charset="utf-8">
		<title></title>
        <!-- jQuery 1.8 or later, 33 KB -->
        <script src="library/js/fotorama/libs/jquery.min.js"></script>

        <!-- Fotorama from CDNJS, 19 KB -->
        <link  href="library/js/fotorama/libs/fotorama.css" rel="stylesheet">
        <script src="library/js/fotorama/libs/4.6.4/fotorama.js"></script>
	</head>
	<body>
        <!-- Add images to <div class="fotorama"></div> -->
        <div class="fotorama"
            data-allowfullscreen="true"
            data-nav="thumbs">
          <img src="library/js/fotorama/image/1.jpg">
          <img src="library/js/fotorama/image/2.jpg">
          <img src="library/js/fotorama/image/3.jpg">
          <img src="library/js/fotorama/image/4.jpg">
          <img src="library/js/fotorama/image/5.jpg">
        </div>
	</body>
</html>
1
2
3
4
5
6
7
8
9
10
11
12
13
14
15
16
17
18
19
20
21
22
23
24
25
2
3
4
5
6
7
8
9
10
11
12
13
14
15
16
17
18
19
20
21
22
23
24
25
# 3.2. 標記參數
根據預設,將參數param_list替換顯示的部分,簡單設定相關選項,設定完成的顯示內容如下:
<!DOCTYPE html>
<html>
  <head>
    <meta charset="utf-8">
    <title></title>
        <!-- jQuery 1.8 or later, 33 KB -->
        <script src="library/js/fotorama/libs/jquery.min.js"></script>

        <link  href="library/js/fotorama/libs/fotorama.css" rel="stylesheet">
        <script src="library/js/fotorama/libs/fotorama.js"></script>
  </head>
  <body>
        <!-- Add images to <div class="fotorama"></div> -->
        <div class="fotorama"
            data-allowfullscreen="true"
            data-nav="thumbs"
            data-width="100%"
             data-ratio="700/467">
          param_list
        </div>
  </body>
</html>
1
2
3
4
5
6
7
8
9
10
11
12
13
14
15
16
17
18
19
20
21
22
2
3
4
5
6
7
8
9
10
11
12
13
14
15
16
17
18
19
20
21
22
至此,模板內容已設定完成,可進入JQueryFrame元件管理界面,將上述內容填寫入模板中。
# 3.3. 設定參數
在參數界面中,設定上述參數,分別為其設定預設值:
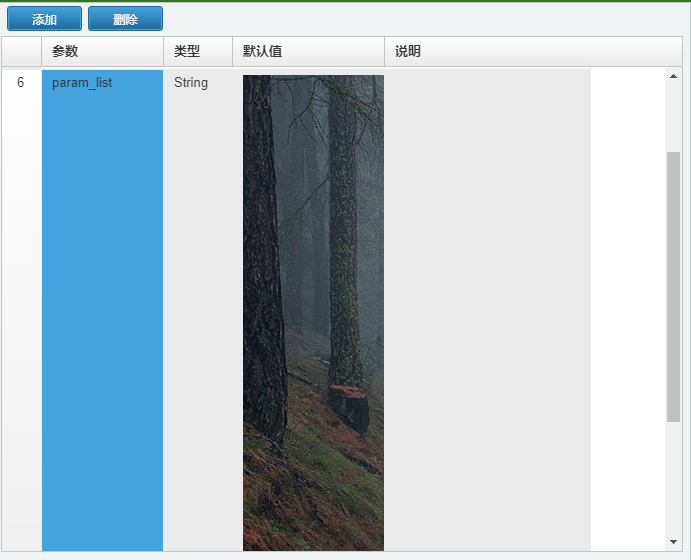
其中的param_list處設定的內容為
<img src="library/js/fotorama/image/1.jpg"><img src="library/js/fotorama/image/2.jpg"><img src="library/js/fotorama/image/3.jpg"><img src="library/js/fotorama/image/4.jpg"><img src="library/js/fotorama/image/5.jpg">
1
設定完成後會在編輯框中顯示圖片資訊。
# 3.4. 與資料庫欄位聯動
此示例無需與資料庫欄位聯動。此部分請留空設定設定。
# 4. 設定檔案
根據上述方式與預設的設定已經可以匯入至UgJQueryFrame中檢視演示。使用圖片展示時,請確保圖片檔案儘量使用解析度一致,縱橫比一致的圖片,這樣能使界面在顯示時達到最佳效果。