
 3D球形全景-汽車內飾
# FastWeb 3D球形全景-汽車內飾
egjs-view360是全景顯示的庫,可用於展示360環繞全景影像或球形全景影像,在移動設備上支援陀螺儀顯示,可帶給使用者身臨其境的感受。本示例將引入球形環繞全景視訊示例,帶大家瞭解如何使用以及球狀製作全景圖片。
# 1. 下載示例
點選https://naver.github.io/egjs-view360/release/latest/dist/PanoViewer/view360.panoviewer.pkgd.min.js (opens new window)以下載庫js檔案,在library/js中建立目錄egjs-view360,將下載的js檔案放置於此。
# 2. 確認參數
使用的線上示例的樣式內容如下:
<!DOCTYPE html>
<html>
	<head>
		<meta charset="utf-8">
		<title></title>
        <link rel="stylesheet" type="text/css" href="https://naver.github.io/egjs-view360/common/css/demo.css">
        <link rel="stylesheet" type="text/css" href="https://naver.github.io/egjs-view360/common/css/PanoControls.css">
        <script src="https://naver.github.io/egjs-view360/release/latest/dist/PanoViewer/view360.panoviewer.pkgd.min.js"></script>
        <script src="https://naver.github.io/egjs-view360/common/js/PanoControls.js"></script>
        <script src="https://naver.github.io/egjs-view360/common/js/PieView.js"></script>
        <script src="https://naver.github.io/egjs-view360/common/js/jquery-2.2.4.js"></script>
        <script src="https://naver.github.io/egjs-view360/common/js/screenfull.min.js"></script>
		<script src="https://cdn.jsdelivr.net/npm/sweetalert2@9.7.2/dist/sweetalert2.all.min.js"></script>
        <script src="https://naver.github.io/egjs-view360/common/js/GyroTouchOptions.js"></script>
        <style>
            .message {
                display: block;
                margin: 10px auto;
                box-shadow: 0 0 0 1px #e0b4b4 inset, 0 0 0 0 transparent;
                background-color: #fff6f6;
                color: #9f3a38;
                padding: 1em 1.5em;
                box-sizing: border-box;
                width: 100%;
                max-width: 800px;
            }
            .message span {
                font-weight: bold;
            }
            .phone {
                position: absolute;
                width: 36px;
                height: 60px;
                left: 0;
                right: 0;
                top: 0;
                bottom: 0;
                margin: auto;
                border-radius: 5px;
                background: #333;
                transform: rotate(20deg);
            }
            .phone:before {
                position: absolute;
                content: "";
                width: 30px;
                height:40px;
                left: 0;
                right: 0;
                top: 0;
                bottom: 0;
                margin: auto;
                background: #fff;
            }
            .rotate {
                position: absolute;
                width: 100%;
                height: 30px;
                border-radius: 50%;
                border: 3px solid #aaa;
                border-bottom: 0;
                left: 0;
                right: 0;
                top: 0;
                bottom: 0;
                margin: auto;
                transform: rotate(20deg);
                z-index: -2;
                box-sizing: border-box;
            }
            .rotate:before, .rotate:after {
                position: absolute;
                content: "";
                border-top: 7px solid transparent;
                border-bottom: 7px solid transparent;
                bottom: -5px;
            }
            .rotate:before {
                border-left: 10px solid #aaa;
                left: 15px;
                transform: rotate(10deg);
            }
            .rotate:after {
                border-right: 10px solid #aaa;
                right: 15px;
                transform: rotate(-10deg);
            }
        </style>
	</head>
	<body>
    </div>
    <div class="panoviewer-container viewer">
        <div id="panoSet">
            <div class="panoviewer container" id="myPanoViewer"></div>
        </div>
    </div>
    <script>
        /*if (navigator.userAgent.indexOf("Mobi") === -1) {
            document.querySelector(".message").style.display = "block";
        } */

        /* create PanoViewer with option */
        var PanoViewer = eg.view360.PanoViewer;
        var container = document.getElementById("myPanoViewer");
        var panoViewer = new PanoViewer(container, {
            image: "https://naver.github.io/egjs-view360/examples/panoviewer/controls/equi-car-inside.jpg",
            projectionType: "equirectangular",
            useZoom: true,
            yawRange: [-180, 180], /* horizontal FOV by degree is 360. */
            pitchRange: [-90, 90], /* vertical FOV by degree is 70. */
            fovRange: [30, 70] /* max fov should vertical FOV of the image. */
        });

        var panoviewerSet = document.getElementById("panoSet");
        PanoControls.init(panoviewerSet, panoViewer, {enableGyroOption: true, enableTouchOption: true});
        PanoControls.showLoading();
    </script>
	</body>
</html>
2
3
4
5
6
7
8
9
10
11
12
13
14
15
16
17
18
19
20
21
22
23
24
25
26
27
28
29
30
31
32
33
34
35
36
37
38
39
40
41
42
43
44
45
46
47
48
49
50
51
52
53
54
55
56
57
58
59
60
61
62
63
64
65
66
67
68
69
70
71
72
73
74
75
76
77
78
79
80
81
82
83
84
85
86
87
88
89
90
91
92
93
94
95
96
97
98
99
100
101
102
103
104
105
106
107
108
109
110
111
112
113
114
115
116
117
118
119
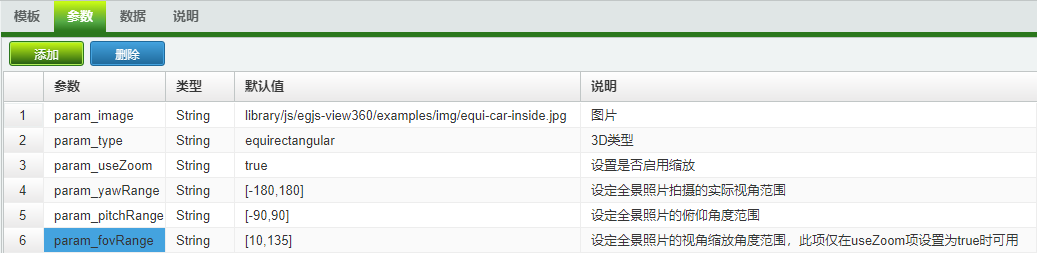
其中我們從106行開始找到可配置的專案,將各配置項后的設定值使用參數進行替換。分別替換的名稱為param_image,param_useZoom,param_yawRange、param_pitchRange、param_fovRange。
# 3. 修改模板
# 3.1. 本地化處理
可以看到上述的html文件中引入了外部鏈接庫檔案,將整理的以下鏈接指向的檔案下載下來並按照指示放入指定目錄中。
以下檔案請放入library/js/egjs-view360/common/css/目錄
https://naver.github.io/egjs-view360/common/css/demo.css
https://naver.github.io/egjs-view360/common/css/PanoControls.css

以下檔案請放入library/js/egjs-view360/common/js/目錄
https://naver.github.io/egjs-view360/common/js/PanoControls.js
https://naver.github.io/egjs-view360/common/js/PieView.js
https://naver.github.io/egjs-view360/common/js/jquery-2.2.4.js
https://naver.github.io/egjs-view360/common/js/screenfull.min.js
https://cdn.jsdelivr.net/npm/sweetalert2@9.7.2/dist/sweetalert2.all.min.js
https://naver.github.io/egjs-view360/common/js/GyroTouchOptions.js

以下檔案下載下來后請將檔案放入library/js/egjs-view360/examples/img/目錄
https://naver.github.io/egjs-view360/examples/panoviewer/controls/equi-car-inside.jpg
2
3
4
5
6
7
8
9
10
11
12
13
14
部分庫檔案需依賴圖示檔案,從以下地址下載圖示檔案並將其放入指定目錄中。
以下檔案請放入library/js/egjs-view360/common/img/目錄
https://naver.github.io/egjs-view360/common/img/sp_component.png
https://naver.github.io/egjs-view360/common/img/common_loading_mo_white.gif
2
3
將html文件中對應的鏈接修改爲本地的相對鏈接,修改後的示例如下:
<!DOCTYPE html>
<html>
  <head>
    <meta charset="utf-8">
    <title></title>
        <link rel="stylesheet" type="text/css" href="library/js/egjs-view360/common/css/demo.css">
        <link rel="stylesheet" type="text/css" href="library/js/egjs-view360/common/css/PanoControls.css">
        <script src="library/js/egjs-view360/view360.panoviewer.pkgd.min.js"></script>
        <script src="library/js/egjs-view360/common/js/PanoControls.js"></script>
        <script src="library/js/egjs-view360/common/js/PieView.js"></script>
        <script src="library/js/egjs-view360/common/js/jquery-2.2.4.js"></script>
        <script src="library/js/egjs-view360/common/js/screenfull.min.js"></script>
    <script src="library/js/egjs-view360/common/js/sweetalert2.all.min.js"></script>
        <script src="library/js/egjs-view360/common/js/GyroTouchOptions.js"></script>
        <style>
            .message {
                display: block;
                margin: 10px auto;
                box-shadow: 0 0 0 1px #e0b4b4 inset, 0 0 0 0 transparent;
                background-color: #fff6f6;
                color: #9f3a38;
                padding: 1em 1.5em;
                box-sizing: border-box;
                width: 100%;
                max-width: 800px;
            }
            .message span {
                font-weight: bold;
            }
            .phone {
                position: absolute;
                width: 36px;
                height: 60px;
                left: 0;
                right: 0;
                top: 0;
                bottom: 0;
                margin: auto;
                border-radius: 5px;
                background: #333;
                transform: rotate(20deg);
            }
            .phone:before {
                position: absolute;
                content: "";
                width: 30px;
                height:40px;
                left: 0;
                right: 0;
                top: 0;
                bottom: 0;
                margin: auto;
                background: #fff;
            }
            .rotate {
                position: absolute;
                width: 100%;
                height: 30px;
                border-radius: 50%;
                border: 3px solid #aaa;
                border-bottom: 0;
                left: 0;
                right: 0;
                top: 0;
                bottom: 0;
                margin: auto;
                transform: rotate(20deg);
                z-index: -2;
                box-sizing: border-box;
            }
            .rotate:before, .rotate:after {
                position: absolute;
                content: "";
                border-top: 7px solid transparent;
                border-bottom: 7px solid transparent;
                bottom: -5px;
            }
            .rotate:before {
                border-left: 10px solid #aaa;
                left: 15px;
                transform: rotate(10deg);
            }
            .rotate:after {
                border-right: 10px solid #aaa;
                right: 15px;
                transform: rotate(-10deg);
            }
        </style>
  </head>
  <body>
    <div class="panoviewer-container viewer">
        <div id="panoSet">
            <div class="panoviewer container" id="myPanoViewer"></div>
        </div>
    </div>
    <script>
        /*if (navigator.userAgent.indexOf("Mobi") === -1) {
            document.querySelector(".message").style.display = "block";
        } */

        /* create PanoViewer with option */
        var PanoViewer = eg.view360.PanoViewer;
        var container = document.getElementById("myPanoViewer");
        var panoViewer = new PanoViewer(container, {
            image: "library/js/egjs-view360/examples/img/equi-car-inside.jpg",
            projectionType: "equirectangular",
            useZoom: true,
            yawRange: [-180, 180], /* horizontal FOV by degree is 360. */
            pitchRange: [-90, 90], /* vertical FOV by degree is 70. */
            fovRange: [30, 70] /* max fov should vertical FOV of the image. */
        });

        var panoviewerSet = document.getElementById("panoSet");
        PanoControls.init(panoviewerSet, panoViewer, {enableGyroOption: true, enableTouchOption: true});
        PanoControls.showLoading();
    </script>
  </body>
</html>
2
3
4
5
6
7
8
9
10
11
12
13
14
15
16
17
18
19
20
21
22
23
24
25
26
27
28
29
30
31
32
33
34
35
36
37
38
39
40
41
42
43
44
45
46
47
48
49
50
51
52
53
54
55
56
57
58
59
60
61
62
63
64
65
66
67
68
69
70
71
72
73
74
75
76
77
78
79
80
81
82
83
84
85
86
87
88
89
90
91
92
93
94
95
96
97
98
99
100
101
102
103
104
105
106
107
108
109
110
111
112
113
114
115
116
117
118
# 3.2. 標記參數
將上述的參數取值分別用參數名稱來代替,替換后的內容如下:
<!DOCTYPE html>
<html>
  <head>
    <meta charset="utf-8">
    <title></title>
        <link rel="stylesheet" type="text/css" href="library/js/egjs-view360/common/css/demo.css">
        <link rel="stylesheet" type="text/css" href="library/js/egjs-view360/common/css/PanoControls.css">
        <script src="library/js/egjs-view360/view360.panoviewer.pkgd.min.js"></script>
        <script src="library/js/egjs-view360/common/js/PanoControls.js"></script>
        <script src="library/js/egjs-view360/common/js/PieView.js"></script>
        <script src="library/js/egjs-view360/common/js/jquery-2.2.4.js"></script>
        <script src="library/js/egjs-view360/common/js/screenfull.min.js"></script>
    <script src="library/js/egjs-view360/common/js/sweetalert2.all.min.js"></script>
        <script src="library/js/egjs-view360/common/js/GyroTouchOptions.js"></script>
        <style>
            .message {
                display: block;
                margin: 10px auto;
                box-shadow: 0 0 0 1px #e0b4b4 inset, 0 0 0 0 transparent;
                background-color: #fff6f6;
                color: #9f3a38;
                padding: 1em 1.5em;
                box-sizing: border-box;
                width: 100%;
                max-width: 800px;
            }
            .message span {
                font-weight: bold;
            }
            .phone {
                position: absolute;
                width: 36px;
                height: 60px;
                left: 0;
                right: 0;
                top: 0;
                bottom: 0;
                margin: auto;
                border-radius: 5px;
                background: #333;
                transform: rotate(20deg);
            }
            .phone:before {
                position: absolute;
                content: "";
                width: 30px;
                height:40px;
                left: 0;
                right: 0;
                top: 0;
                bottom: 0;
                margin: auto;
                background: #fff;
            }
            .rotate {
                position: absolute;
                width: 100%;
                height: 30px;
                border-radius: 50%;
                border: 3px solid #aaa;
                border-bottom: 0;
                left: 0;
                right: 0;
                top: 0;
                bottom: 0;
                margin: auto;
                transform: rotate(20deg);
                z-index: -2;
                box-sizing: border-box;
            }
            .rotate:before, .rotate:after {
                position: absolute;
                content: "";
                border-top: 7px solid transparent;
                border-bottom: 7px solid transparent;
                bottom: -5px;
            }
            .rotate:before {
                border-left: 10px solid #aaa;
                left: 15px;
                transform: rotate(10deg);
            }
            .rotate:after {
                border-right: 10px solid #aaa;
                right: 15px;
                transform: rotate(-10deg);
            }
        </style>
  </head>
  <body>
    <div class="panoviewer-container viewer">
        <div id="panoSet">
            <div class="panoviewer container" id="myPanoViewer"></div>
        </div>
    </div>
    <script>
        /*if (navigator.userAgent.indexOf("Mobi") === -1) {
            document.querySelector(".message").style.display = "block";
        } */

        /* create PanoViewer with option */
        var PanoViewer = eg.view360.PanoViewer;
        var container = document.getElementById("myPanoViewer");
        var panoViewer = new PanoViewer(container, {
            image: "param_image",
            projectionType: "param_type",
            useZoom: param_useZoom,
            yawRange: param_yawRange, /* horizontal FOV by degree is 360. */
            pitchRange: param_pitchRange, /* vertical FOV by degree is 70. */
            fovRange: param_fovRange /* max fov should vertical FOV of the image.  */
        });

        var panoviewerSet = document.getElementById("panoSet");
        PanoControls.init(panoviewerSet, panoViewer, {enableGyroOption: true, enableTouchOption: true});
        PanoControls.showLoading();
    </script>
  </body>
</html>
2
3
4
5
6
7
8
9
10
11
12
13
14
15
16
17
18
19
20
21
22
23
24
25
26
27
28
29
30
31
32
33
34
35
36
37
38
39
40
41
42
43
44
45
46
47
48
49
50
51
52
53
54
55
56
57
58
59
60
61
62
63
64
65
66
67
68
69
70
71
72
73
74
75
76
77
78
79
80
81
82
83
84
85
86
87
88
89
90
91
92
93
94
95
96
97
98
99
100
101
102
103
104
105
106
107
108
109
110
111
112
113
114
115
116
117
118
可進入JQueryFrame元件管理界面,將上述內容填寫入模板中。此庫由於引用了較多的外部的css與js檔案,為保證其不被FastWeb框架影響,建議使用URLFrame容器引入。
# 3.3. 設定參數
在參數界面中,設定上述參數,分別為其設定預設值:
# 3.4. 與資料庫欄位聯動
可以設定數據來源於資料庫欄位,此示例可留空不設定。
# 4. 設定檔案
全景瀏覽的示例使用的相片為球狀全景影象,如需要自行設計球狀全景圖片,可參考以下方式進行設定。
球狀全景照片可使用支援360度拍攝的全景相機來進行拍攝。也可以自行使用照相機來拍攝。接下來介紹如何規劃拍攝全景照片。
在拍攝前,請先觀察拍攝的環境,確定拍攝的相機要固定的位置,移走周邊環境中會影響相機拍攝的物體,保持周邊場景寬敞。
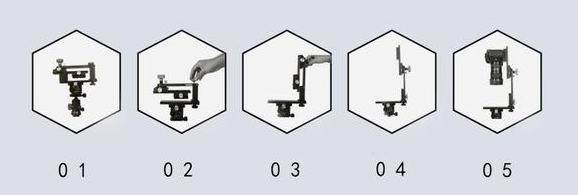
準備帶廣角鏡頭的相機(單反相機+廣角鏡頭或者帶廣角模式的手機也可)、三腳架、全景雲臺(推薦使用)。
調整相機的相關參數以適應拍攝,主要有以下方面:
- 調整相機鏡頭的對焦模式,建議使用手動對焦的模式,將對焦點調整至無限遠,保證拍攝的全景影象遠處的畫面也能清晰可見。
- 固定相機的焦距,在拍攝過程中不要變動焦距,否則會導致後期照片無法拼接。
- 為保證相機成像的質量,在移動相機時要根據環境的變化調整到相機的感光度、曝光補償、焦段、光圈值。
架設相機三腳架,將腳架調整至水平狀態,安裝雲臺至腳架上,調整其為水平。打開雲臺調整雲臺至垂直方向,將相機安裝至雲臺上,將相機調整至垂直向下,以刻度垂直線為參考線確保相機垂直中心點與參考線平行,校準后,將雲臺臂桿向地面垂直調整至向地面平行,調整相機,確保相機水平方向與地面平行。
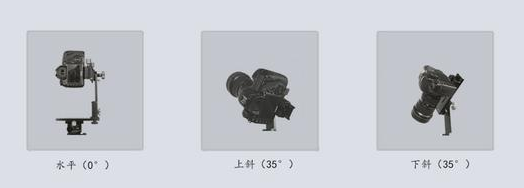
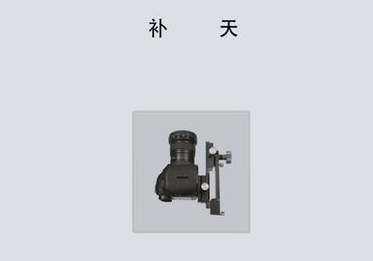
接下來開始拍攝,主要的拍攝有以下角度:水平、上斜、下斜、補天、補地。水平調節的角度為0°,上斜調整角度為向上35°,下斜角度為向下35°。
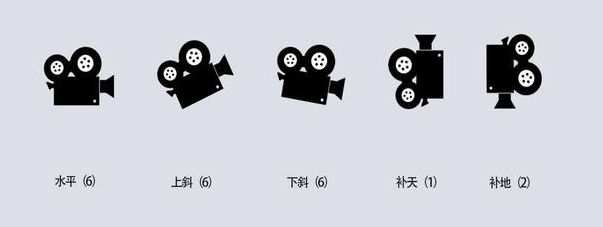
水平、上斜、下斜的方向上均拍攝六張照片,可檢視雲臺或其他輔助設備,分別在刻度為0°、60°、120°、180°、240°、300°的位置上拍攝一張照片。共計水平六張為一組,上斜六張為一組、下斜六張為一組,拍攝十八張照片。
補天拍攝。調整雲臺刻度為垂直向上90°,垂直對準天空拍攝一張,補天一張為一組。
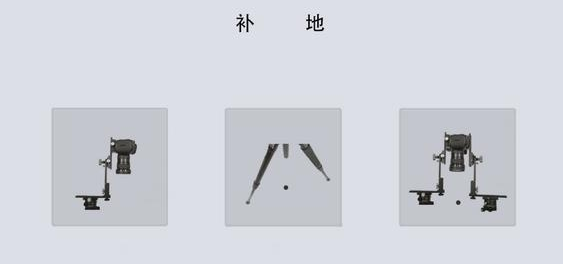
補地拍攝。調整雲臺角度為地面方向,調整刻度為垂直向下90°,找準三腳架的中心點位置,以腳架中心點為軸心點,水平方向180°移動腳架,將螢幕中心點正對軸心點,每180°拍攝一張,補地兩張為一組。
將拍攝的圖片匯入至PTGui中,使用球形拼接模式導出即可獲得適用於全景顯示的界面。最終匯入專案的全景圖片建議寬度與高度壓縮至4000*2000以下,避免在移動設備上檢視相關內容時出現無法檢視的情況。